How to Build a Shed from a Kit
Share If You Enjoy This!
For those of you who prefer to simply buy a shed kit, this article is written for you. A veteran builder takes a quick route to a great shed with a precut kit. Here are the step-by-step plans to get it done.
Introduction
 For years, there have been three ways to get a shed: Build it yourself, hire someone to build it or buy a prefab model.
A new methodconstructing a shed from a kitcombines the sweat equity of building from scratch with the simplicity of using factory-cut components. All that's required are basic tools and novice-level carpentry skills. It's like doing a jigsaw puzzle with instructions: Fasten the parts together in the right sequence, and voilàa shed is born.
I teamed up with a carpenter, Tim, to build this shed from BettyMills. The compact 6 x 8foot building has red-cedar vertical siding, two barn-sash windows and a transom window above double doors. This kit costs about $4800, not including shipping. The small kit joins the company's eight stock kits ranging in size from 10 x 10 to 10 x 16 feet, and in price from about $4300 to $8300. They are all available with either pine or cedar siding.
Click here to order the Shed Kit from BettyMills >>
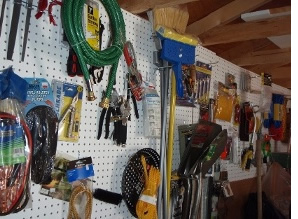
Our shed came with everything except the concrete-block foundation, roof shingles and fasteners. It included plans, necessary to obtain a building permit. Local governments often have shed-specific forms detailing the rules for auxiliary structures. The permit application fee is typically $50 to $100and it's a lot smarter to pay up and follow the rules than to be penalized later.
Shed kits are structurally sound by design, so you shouldn't run into roadblocks. There are just two major details to get right. First, follow setback guidelines when you're deciding where to build. Second, choose the right kind of foundation. This will be dictated by the building's size. A frame of pressure-treated landscape timbers staked into the ground may be all that's required, or you may need to pour a concrete pad. In our case, the rules permitted a concrete-block foundation.
Tim and I built the foundation, then installed roofing and trim on the 6 x 8foot shed in a day. The parts fit perfectly, and the finished kit was indistinguishable from a scratch-built custom shed. I packed up my tools and headed home feeling just a bit tired and sore, but proud of the building we'd left behind.
Toolshed Splurges
 Classic, attractive, built-to-last exterior details can have an outsize visual impact, but their cost may be prohibitive when scaled to fit an entire house. Shrink the upgrades to a shed, though, and the costs are much less formidable. Here are four details that will add distinct character to an outbuilding, whether you are building a shed from scratch or assembling a kit.
Copper Gutters: Properly installed, a copper gutter can last 50 years. (Aluminum-gutter warranties typically last 20.) Half-round styles in 5- or 6-inch-diameter sizes cost about $10 per linear foot, often sold in 10-foot sections.
Window Shutters: Functional shutters aren't cheap, but on a shed with a single large window, only one stately wooden pair is necessary. Consider Timberlanewith mortise-and-tenon joinery and hand-forged hardware, these shutters are the real deal. Match the iron tieback hardware (aka shutter dogs) to the shed's door hinges.
Flower Boxes: Build window boxes of rot-resistant cedar or paint stock lumber with an exterior-grade acrylic. Build the box in the shed and hang it outside as a test container for new plantings.
Special Shingles: For a small roof, asphalt isn't the only economical option. Slate or copper shingles have old-fashioned appeal and a rich aesthetic. They also age well. As a modern option, new synthetic roof styles can offer a lifetime of performance. DaVinci Roofscapes pulls off a convincing replica of cedar shake and slate.
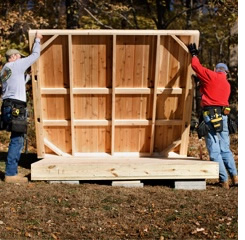
Step 1: Foundation
 Shed kits typically don't include the foundation. We used 4-inch-thick solid-concrete blocks to support the 6 x 8foot shed. Each block was set down on compacted soil, leveled in two directions and checked one against another. We shimmed up low blocks with 2-inch-thick concrete patio blocks, cedar 1 x 8s or asphalt roof shingles.
We set the pressure-treated floor joists onto the mudsills and fastened their ends with 3 1/2-inch-long nails. We used the plywood floor deck to frame the four shed walls, positioning the studs and rough openings for the windows and doors.
Click here to order the Shed Kit from BettyMills >>
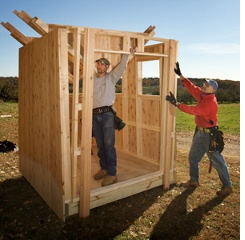
Step 2: Framing
 After framing each wall, we installed the tongue-and-groove vertical-board siding while the wall was still horizontal. This premium kit included red-cedar siding, but less expensive pine siding is also available.
We installed the windowless sidewall first, tipping it up into place and then screwing down through the bottom plate and into the floor frame. Once the first two walls were screwed down, we slid the second sidewall into place. This wall has two barn-sash windows, so we positioned it on the side with the best views. You need at least two people to put up a shed kit, and the work would go quicker with three or four people.
Some labor-saving shortcuts kept the work manageable. For instance, the front wall, framed for double doors, was installed last. Before doing that, we assembled the roof trussesthe precut rafters and ceiling joists joined together with plywood gusset plates, which are glued and nailed across the joints. We then placed the two gable-end trusses on top of the sidewalls. That way, we didn't have to lift the heavy trusses up and over the walls.
Share If You Enjoy This!
Step 3: Roof Trusses
 With two gable-end trusses propped between the side walls, we installed the front wall. We tipped and fastened the gable-end trusses and installed standard roof trusses in between.
Click here to order the Shed Kit from BettyMills >>
Step 4: Roof Shingles
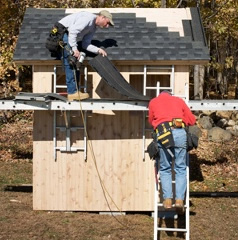 We used precut pieces of 1/2-inch exterior-grade plywood to sheathe the roof. The plywood is cut precisely to create a space along the roof peak for installing a ridge vent.
We then covered the shed roof with slate-gray architectural shingles, which we chose because they are much more attractive than standard three-tab shingles.
Step 5: Windows, Doors
 Our kit included sash windows on two walls and a transom window above the doors. The transom is the kind of detail that's typically found only on custom-built sheds, not on prefab models. And the company supplied a pair of heavy-duty strap hinges to hang each swinging door. When considering a shed kit, remember that quality hardware is just as important as quality lumber.
Share If You Enjoy This!
Click Here To View All Pre-Built Sheds From BettyMills

Click HERE to view the full range of ready-made shed kits from BettyMills!